Mostrar mensagens com a etiqueta plasticina. Mostrar todas as mensagens

segunda-feira, 14 de julho de 2025

Flores azuis com pasta de moldagem

Para acabar um resto de pasta de moldagem azul que ainda tinha, fiz estas flores.
To finish some blue air dry clay that I still had, I made these flowers.

Estas foram feitas do mesmo modo descrito aqui:
These were made in the same way described here:
Pintei depois as flores com tinta dourada no centro e aguarelas azul metálica nas pétalas.
I painted the flowers with golden paint oin the center and metallic watercolors on the petals.

Fiz ainda estas flores com esta técnica.

As folhas foram pintadas com tinta verde.
The leaves were painted with green paint.

Os estames são dos das flores artificiais: cortei a parte amarela e colei com cola no centro da flor.
The stamens are from those of the artificial flowers: I cut off the yellow part and glued it to the center of the flower.
Mais trabalhos:
More crafts:

segunda-feira, 6 de maio de 2024

Livro feito com pasta de modelagem

Nestas aventuras com pasta de modelar, já andava há algum tempo a matutar em fazer um livro. Tinha pasta preta, que não dá para muita coisa mas dá uma capa de livro gira.
In my adventures with modelling paste, I has been pondering for some time to make a book. I had some black paste, which doesn't really work for much but would give a nice book cover.

Depois de muitas voltas na minha cabeça, e finalmente muitas voltas nas minha mãos, lá consegui fazer uma capa de livro. 
After many tossing and turning in my head, and finally in my hands, I managed to make a book cover.

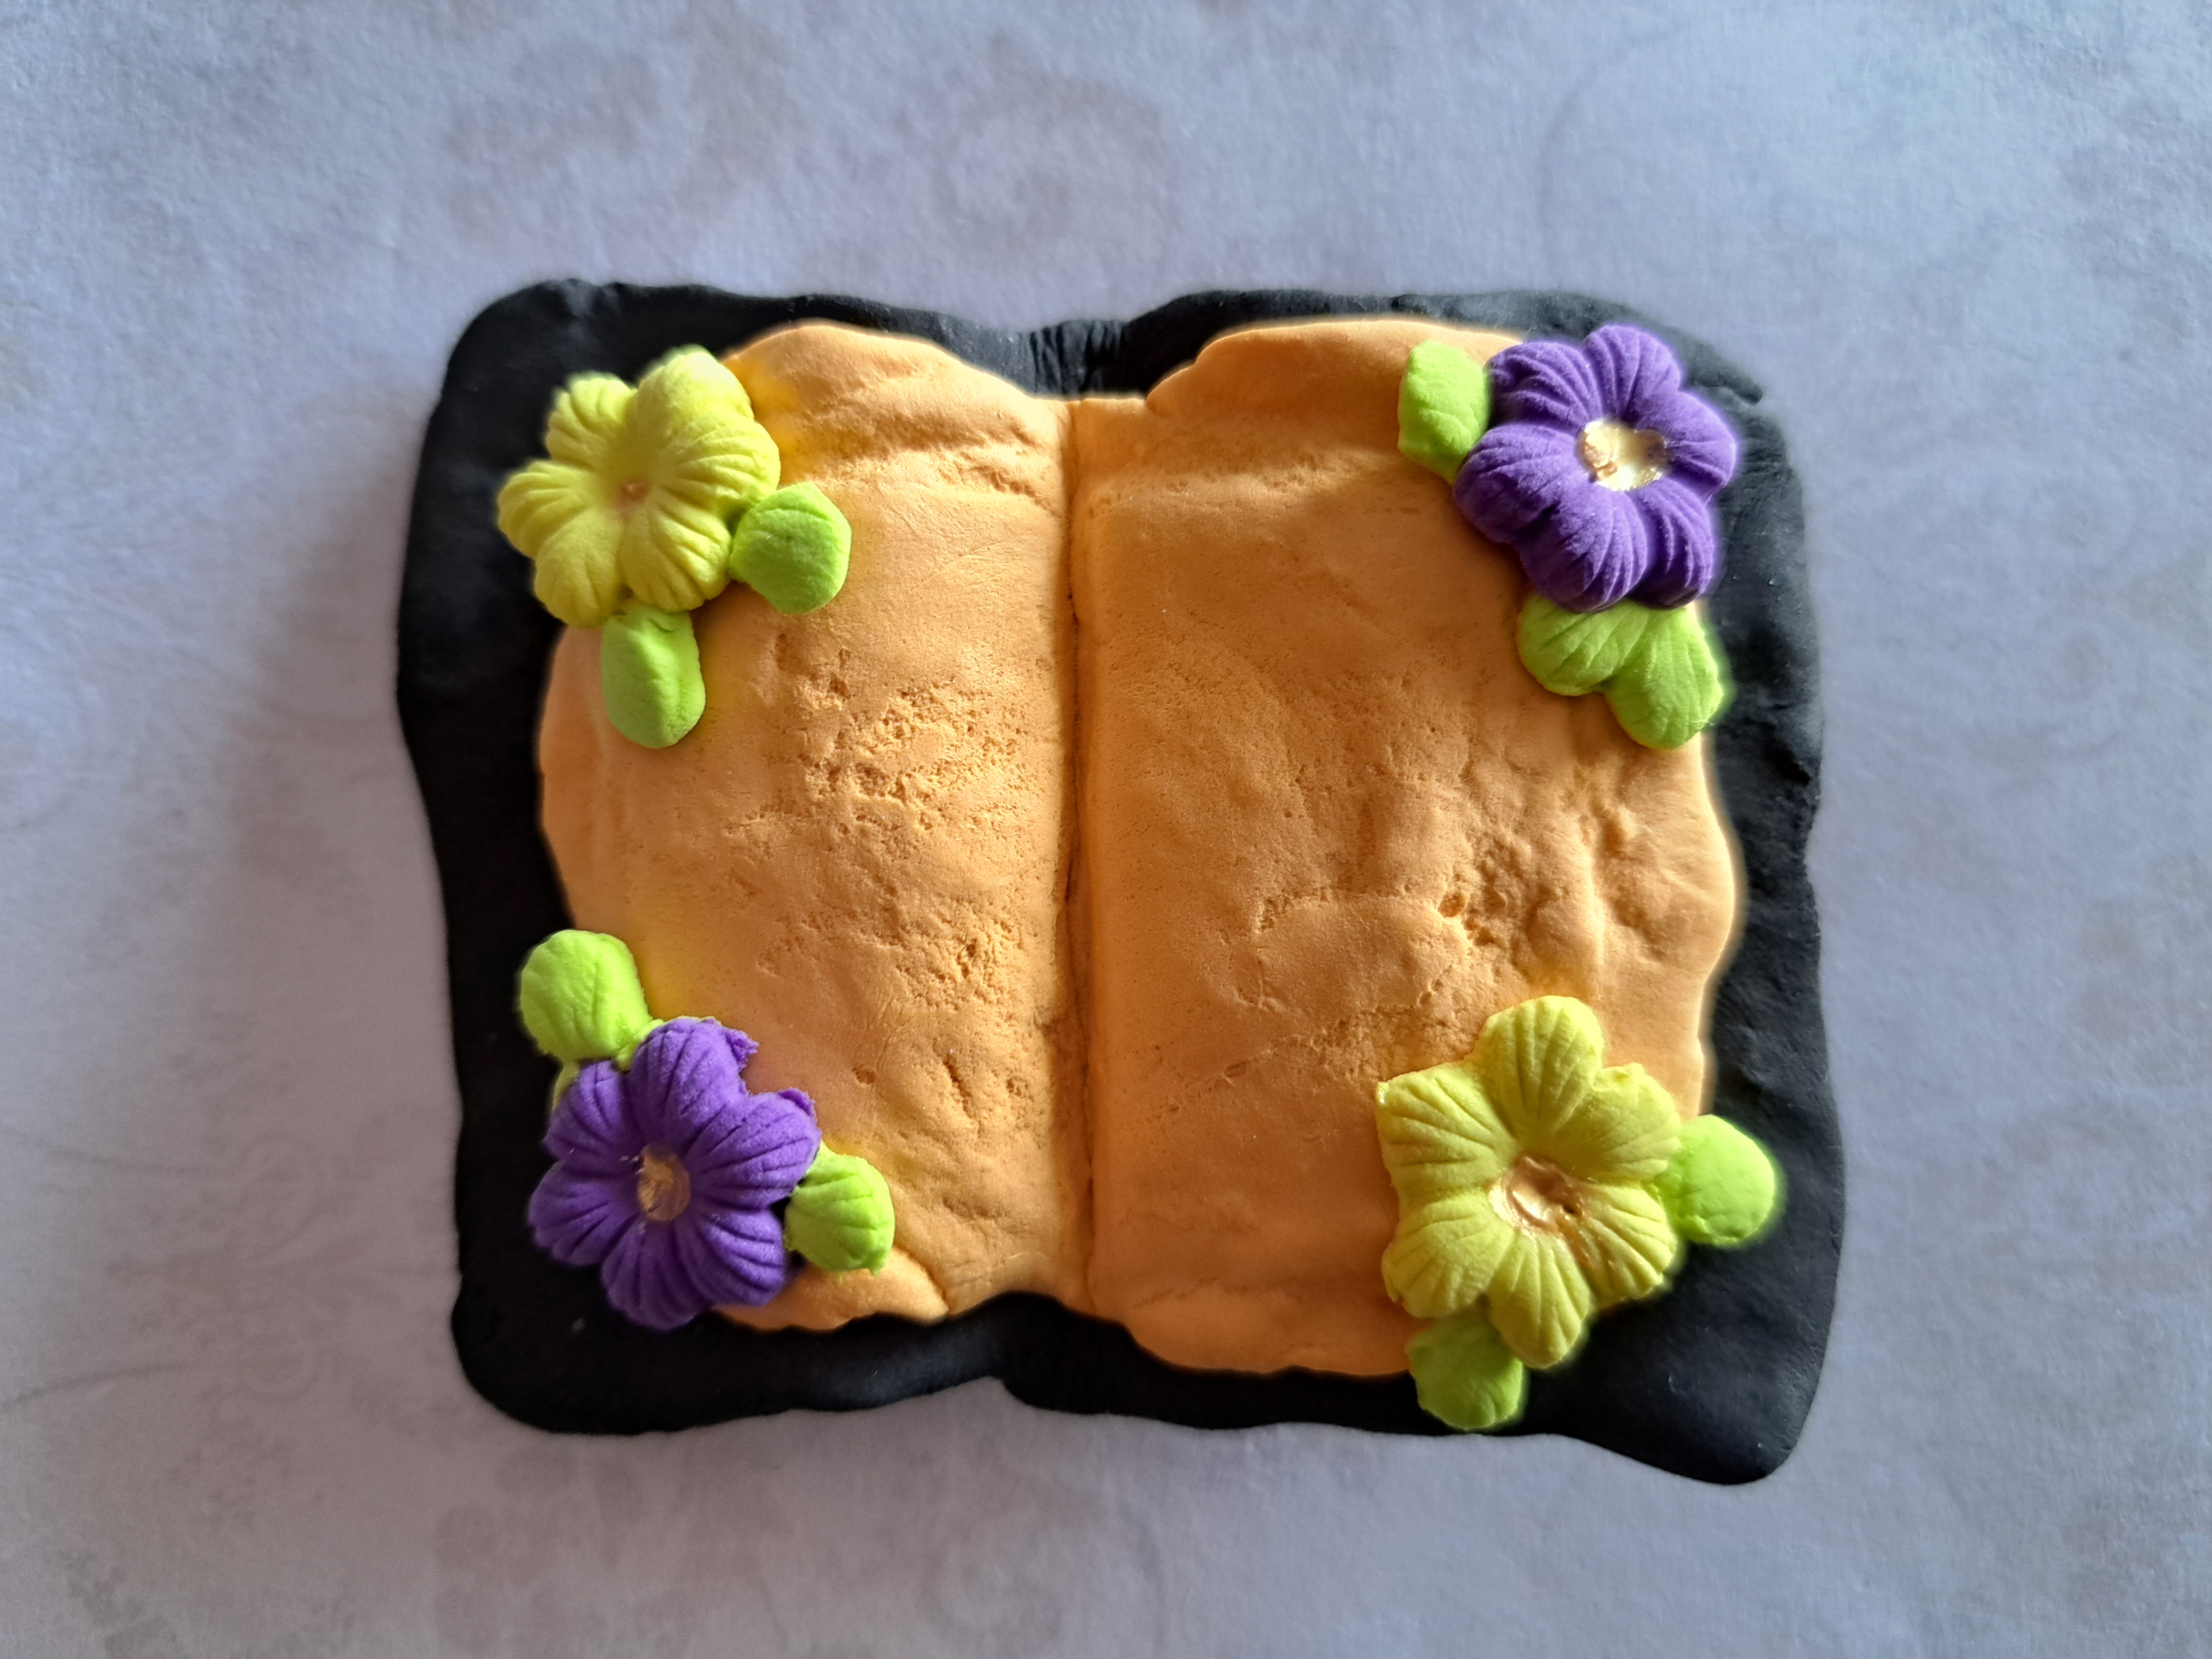
As páginas eram para ser mais perfeitas a verem-se que eram várias, mas a paciência tem limites, e infelizmente o jeito também 😅 Com pasta amarela e um pouco de rosa lá consegui esta cor alaranjada que me agradou. E com muuuuuuitas voltas lá consegui umas páginas fundidas 😂 que até nem ficou mal!
The pages, these were supposed to be more perfect, seeing that they were several, but patience has limits, and unfortunately so does talent 😅 With yellow paste and a bit of pink, I got a orangy color that I actually liked. And after maaaaaaaaany tosses and turns I managed some fused into one pages 😂 which actually turned out pretty good!

E claro que isto tudo surgiu porque eu tinha feito estas flores e achei que ficariam giras num livro! E assim algumas delas foram parar às páginas do livro. Colei-as com cola PVA.
And of course, this all emerged because I had made these flowers and I thought they'd look pretty nice in a book! And that is how some of them got on the pages of the book. I glued them with PVA glue.

Mais ou menos pela mesma época fiz a flor violeta maior que agora enfeita a capa 😊 Também foi colada com cola vinílica.
By the same time, I also made a larger violet flower that now decorates the cover 😊 It was also glued with PVA glue.

E assim ficou o livrinho, um pouco diferente dos planos originais mas melhor do que eu entretanto esperava ficar!
And so this is how the little book came out, different from the original plans but better than what I meanwhile expected!

Com tinta dimensional dourada, pintei uns detalhes subtéis na capa.
I subtly embellished the cover with golden dimensional paint.

Ficou com um ar rústico quase da época dos Flintstones 😆 mas eu até gosto😊
It has a rustic look almost from the Flintstones 😆 but I actually like it 😊
Trabalhos relacionados:
Related works:

Amoras com pasta de modelar:
Modelling paste blackberries:

Girassol com pasta de modelar:
Modelling paste sunflower:
https://manualidadesenaoso.blogspot.com/2023/07/girassol-com-pasta-de-moldar.html

Flores com pasta de modelar:

Mais trabalhos em:
More crafts in:

segunda-feira, 10 de julho de 2023

Potinho amoras

A semana passada apresentei as minhas amoras feitas com pasta de moldar:
Last week, I showed you my air-dry clay blackberries:

A querida Paula do blog Vivendo e Escrevendo uma Vida Simples sugeriu juntar as amoras e fazer um imã. A Liliana do blog Ideias Recicladas e .. não só concordou com ela.
Dear Paula from the blog Vivendo e Escrevendo uma Vida Simples suggested I join the blackberries to make a magnet. Dear Liliana from the blog Ideias Recicladas e .. não só agreed with her.

Assim eu usei a ideia, mas foi para decorar outro potinho :D O Potinho Amoras! 
So I used the idea, but to decorate another jar :D The Blackberry Jar! 

Colei-as com cola quente à tampa e colei umas folhinhas de tecido também.
I glued on the berries with hot glue and glued some fabric leaves too.

Depois fiz uma flor em croché muito simples.
Then, I crocheted a very simple flower.

Para a flor comecei com um anel mágico. Dentro do anel mágico fiz 5 mb. Antes de unir para fazer um anel, usei linha da padeiro no centro para fazer os estames que depois desfiei.
To make the flower, I made a magic ring. Inside the magic ring, I did 5 sc. Before closing the ring, I used baler's twine in the center to make the stamens and then I unraveled the twine.

Em cada mb, fiz 1mb, 1mpa, 1pa, 1mpa, 1mb para fazer cada pétala. 
In each sc, I made sc, hdc, dc, hdc, sc to maje each petal.

Pintei o centro com as brush pens ao de leve e passei um pincel com água para misturar as cores (rosa e laranja).
I painted the center of the flower with brush pens very lightly, and used a water brush to blend in the colors (pink and orange).

Em seguida, fiz uma folha como no potinho girassol, fiz o cordão e prendi a flor ao cordão com uma mb.
Then, I crocheted a leaf just like for the sunflower jar, made the cord and attached the flower with a sc st.
Mais trabalhos em croché:
More crocheted works:

Mais trabalhos:
More crafts:

quarta-feira, 5 de julho de 2023

Potinho girassol

Como o prometido é devido, esta publicação é sobre o potinho griassol. 
As promised, this post is about my sunflower jar.

Sim um potinho normal, que foi do humus e agora depois de limpo está a servir para guardar as pastas de moldar para não secarem. Como são muito pegajosas umas às outras, primo-as contra as paredes do pote para não se tocarem.
Yes, a very normal jar, that was of hummus and now after being cleaned is used for storing the air-dry clay pastes so they do not dry out. Since the pastes are sticky between themselves, I have pressed each one against the walls of the jar, so they do not touch.

Quando fiz o girassol:
When I made the sunflower:
https://manualidadesenaoso.blogspot.com/2023/07/girassol-com-pasta-de-moldar.html
achei que ficava super fofo na tampa do potinho. E assim o potinho normalíssimo virou o potinho girassol. O girassol foi colado com cola quente.
I thought is would look super cute on the jar's lid. And that is how a simple jar turned into the sunflower jar. The sunflower was glued on with hot glue.

E claro surgiu logo na minha cabeça fazer duas folhinhas em croché com uma lã verde que gosto imenso! Queria que elas abracassem o potinho 🙐🙖
And of course, the idea sprang to mind of making two crocheted leaves from a green yarn I am very fond of! I wanted the leaves to hug the jar 🙐🙖

Fiz de cabeça mas como podem ver  o esquema é muito simples.
I made from my head, but as you can see the pattern is very simple.

Comecei com uma corr 6. Depois ao longo da corr, mb na m seguinte, mpa na m seguinte, pa nas 2 m seguintes, mpa na m seguinte e mb na m seguinte. Depois do outro lado da correntinha, repetir e unir à 1ª mb. 
I started with ch6, Then along the ch, sc in next st, hdc in next st, dc in next 2 st, hdc in next st, mb in next st. Then on the other side of the ch, repeat and join with 1st sc.

Fazer o cordão com corr até obter o comprimento desejado (que dê para contornar a abertura do potinho). Depois faz-se outra corr 6 e repete-se o processo como para a primeira folha. Une-se à 1ª mb.
Make the ch as long as desired (to go around the opening of the jar). Then make ch6, and repeat the process for the 1st leaf. Join with sc and fasten off.

E voilá, um potinho com girassol feita de pasta de moldar, completo com folhinhas em croche 🌻
And voilá, a jar with an air-dry clay sunflower complete with crocheted leaves 🌻
Mais trabalhos em croché:
More crocheted works:

Mais trabalhos em:
More crafts in:

segunda-feira, 3 de julho de 2023

Girassol com pasta de moldar

Ainda nas aventuras da pasta de moldar, fiz um girassol.  Para o centro usei pasta preta.
Continuing my adventures with air-dry clay paste. I made a sunflower. For the center, I used black paste.

As cores das pétalas não esão uniformes :D isto porque a quantidade de rosa que juntei ao amarelo foi a olho :D e depois dá nisto! As pétalas de trás foi só com o amarelo.
The colors of the petals are not uniform :D this is because the quantity of pink I added to the yellow was eyeballed :D and so this happens! The back petals were done using only yellow.

Pois é, ninguém nos diz que isto é viciante ;)
Yeah, no one warns you this is addictive :)

Depois eu achei que ficava tão giro no potinho onde guarda as pastas :) Para adicionar detalhes ao centro do girassol, juntei um pouco de tinta metálica vermelha.
Then I thought the sunflower would look so cute on the jar lid where I keep the clay paste :) To add some highlights to the sunflower's center, I added a bit of metallic red paint.

As folhas do girassol em croché é tema da próxima publicação 🙐🙖
The crocheted sunflower leaves are the theme of the next post 🙐🙖
Mais trabalhos em:
More crafts in:

quarta-feira, 28 de junho de 2023

Amoras com pasta de moldar

Ora o que fazer com pasta de moldar preta? Amoras!
Now what to do with black air-dry clay paste? Berries!

Juntei um pouco de pasta violeta com a preta e enrolei até misturar. Depois fiz pequenas bolinhas e fui juntando para fazer uma amora.
I added some violet paste to the black paste and rolled it until blended. Then I made tiny balls and joined them to make a berry.

Quando estava quase seca, juntei um pouco de tinta metálica vermelha para fazer uns detalhes.
When they were almost dry, I added some metallic red paint to make some highlights.

Depois fiz a sépala e o pé com pasta amarela. Pintei com brish pens e depois usei uma caneta de água para misturar bem as cores.
Then I made the sepal and the little stick with yellow clay. I coloured them with brush pens and a water pen to blend in the colors.
Trabalhos relacionados:
Related posts:

Flores de pasta de moldar com frisador:
Air-dry clay flowers with punch mold:

Flores com pasta de moldar:

Mais trabalhos em:
More crafts in: