segunda-feira, 29 de junho de 2020

Cartão com renda papel vegetal

Ao lado do croché, os trabalhos em papel são os meus favoritos! E destes, fazer cartões e cadernos é o que mais me agrada.
Besides crochet, paper crafting is my favorite hobby! And of these, card-making and making journals are what pleases me the most.

Desta vez fiz um cartão em cartão azul e papel vegetal branco. O risco é tirado da revista
This time I made a greeting card in blue cardstock and white vellum paper. The pattern is from
Parchment Craft April 2018 pg 34

Eu não tenho aquelas ferramentas para fazer o trabalho rendado. E para dizer a verdade, não sei de terei a paciência :) No entanto, gosto muito de usar os riscos. 
I don't have the tools to make the lacey work. And to be honest, I don't know if I have the patience :) Nevertheless, I very much like to use the pattern.

Tracei o risco com caneta gel branca (Uniball Signo) e depois passei com lápis branco (Lyra). Recortei o motivo e dobrei para trás. Adicionei a cor azul com lápis. 
I traced the pattern with white gel pen (Uniball Signo) and then I traced over with white pencil (Lyra). I fussy cut around the motif and folded back. I added blue color with pencil.


Para segurar a dobra usei fita dupla face debaixo da parte pintada de azul para não se ver. Para segurar o papel vegetal ao cartão também usei a mesma fita debaixo da dobra. Colei uma flor branca autocolante no centro do motivo e colei uma pedrinha azul.
To hold the flap back I used double-sided tape beneath the center part in blue color, so as not to see through. To hold the vellum to the card, I used the same tape under the flap. I added a white sticker flower to the center of the motif and added a blue rhinestone.

Com um furador em forma de flor, furei uma flor em papel decorativo azul e colei uma pedrinha em forma de flor.
With a flower punch, I punched a flower in blue scrapbook paper and added a flower-shaped rhinestone to the center.


No interior, colei um naperon pequenino de papel para combinar com a parte da frente. Tracei o motivo em papel vegetal, recortei e colei com fita dupla face. Colei uma borla azul.
On the inside, I glued a teeny-weeny paper doily to match the front. I traced the small motif in vellum, fussy cut it and adhered with double-sided tape. I glued a blue tassel to it.

A mensagem pode ser escrita no naperon de papel.
The sentiment can be written on the paper doily.


Na parte de trás, cotei o papel mais pequeno do que o cartão na borda. Depois colei com fita dupla face o cartão ao papel vegetal mais ou menos no centro.
For the back of the card, I cut the vellum shorter than the card on the side, Then I used double-sided tape to hold the card to the vellum more or less at the center.

Aproveitei para colar uma borboleta que tinha feito por cima da fita. A borboleta é uma autocolante dourado, colado em cartão azul claro. Depois o interior, foi pintado com canetas gel e esfumado com um cotonete. Com lápis branco, tracei a rota da borboleta :)
I took the opportunity to glue a butterfly I'd made over the tape. The butterfly is a golden sticker glued on light blue cardboard. Then in interior was colored with gel pens and blended with a q-tip. With white pencil, I traced the butterfly's path :)
~
Posts relacionados:
Related posts:

Cartões com abertura:
Aperture cards:

Amores perfeitos em papel vegetal:
Pansies in vellum:

Cartão com borboleta:
Card with butterfly:

sexta-feira, 26 de junho de 2020

Chaveiro em croché

Para o fim de semana, partilho a receita de croché para este chaveirinho fofo e lindo em forma de cacto:
For the weekend, I share the crochet pattern for this cute and beautiful cactus keychain:

Ninguém, sendo tentado, diga: Sou tentado por Deus; porque Deus não pode ser tentado pelo mal e ele a ninguém tenta.
Cada um, porém, é tentado, quando atraído e engodado pela sua própria concupiscência;
Let no man say when he is tempted, I am tempted of God: for God cannot be tempted with evil, neither tempteth he any man:
But every man is tempted, when he is drawn away of his own lust, and enticed.

quarta-feira, 24 de junho de 2020

Coroa de flores

Deixo aqui mais uma contribuição minha para o desafio Crochet Flowers 2020 da Anabelia:
I share another of my contributions for the Crochet Flowers 2020 challenge of Anabelia:

Fiz uma coroa de flores em croché. A inspiração é da receita:
I crocheted a flower wreath. The inspiration came from the pattern in:
Spring Hat Crochet, Annie's Crochet Newsletter #80, pg 18


Para fazer a flor, segui a receita original: 
Com a cor da flor, fazer 4 corr e unir em anel.
1ª volta: fazer 15 p.a. dentro do anel e unir.
2ª volta: em cada p.a. fazer 4 p.a. e unir.
3ª volta: com a cor mais clara, em cada p.a., fazer uma m.b. e unir.
To make the flower, I followed the original pattern:
With the flower color, ch 4 and join in a ring.
Round 1: 15 dc in ring and join.
Round 2: in each dc, do 4 dc and join.
Round 3: with a lighter color, sc in each dc and join.


Eu não costurei as flores no fim. À medida que fui fazendo as flores, fui unindo a que estava a trabalhar à da ponta do cordão, com malha baixíssima. Uni em 3 malhas para as flores não torcerem tanto no cordão e para maior robustez.
I did not stitch the flowers together in the end. As I crocheted the flowers I joined the one I was working on with the one on the end of the flower chain, with a slip stitch. I slipped stitched on 3 stitches so that the flowers don't twist so must and for greater strength.


Para a flor pequena do centro, com a mesma cor da borda, fiz um anel mágico e dentro do anel fiz (1 m.b.,3 p.a.) 4 vezes e uni no fim. Deixei pontas grandes tanto no início como no fim.
For the little flower in the center, with the same color of the edge, I made a magic ring and inside it (1c,2dc) 4 times and joined in the end. I left two long tails in the beginning and end.

Passei as pontas grandes da flor pequena no centro da flor maior colorida e uni as pontas à flor maior por trás.
The two tails of the little center flower were passed through the center of the larger colored flower, and then I joined the tails to the back of the large flower.


Entre cada duas flores adicionei também uma folha: fiz uma correntinha de 5 malhas e depois ao longo da correntinha fiz uma m.b., uma p.b. e 3 p.a.. No fim uni a folha no meio de duas flores.
Between every two flowers I also added a leaf: I made a chain of 5 stitches, and across the chain I did 1sc, 1hdc and 3 dc. Then I joined the leaf between two flowers.


Desta forma tanto tenho uma coroa de flores para o chapéu de palha para decorar um quarto, como tenho uma coroa de flores em si própria uma linda decoração.
This way, I have a flower wreath for the straw hat to decorate a room, and I have a flower wreath that is in itself a beautiful ornament.

As minha últimas contribuições para o desafio Crochet Flowers 2020:
My most recent contributions to the Crochet Flowers 2020 challenge:

Flores de cornizo em croché:
Crocheted dogwood flowers:

Marcador de livro floral:
Floral bookmark:

Flores de primavera em croché:
Crocheted spring flowers:

segunda-feira, 22 de junho de 2020

Quadro botânico com flores de croché

Com tantas flores de croché por causa do desafio Crochet Flowers 2020 da Anabelia:
With so many crocheted flowers because of the Crochet Flowers 2020 challenge of Anabelia:

Fiz este quadro, Imprimi duas imagens botânicas cada uma numa folha A4, que colei num quadro grande. Depois colei algumas florzinhas de croché que havia feito :)
I made this wall frame. I printed two botanical images each on a A4 sized sheet of paper, that I glued to a large frame. Then I glued some crocheted flowers I'd done :)

Usei uma destas flores de cerejeira:
I used one of these cherry blossoms:
e duas destas flores primaveris:
and two of these spring flowers:
além de também ter usado uma flor de cornizo cuja receita está aqui:
and also a dogwood flower whose pattern is here:
Mais quadros:
More wall frames:

Miosótis em croché para shadowbox:
Crocheted forget-me-nots for shadowbox:
https://manualidadesenaoso.blogspot.com/2020/04/miosotis-em-croche.html

Gráfico para quadro:
Printable for wall frame:
https://manualidadesenaoso.blogspot.com/2019/06/grafico-para-imprimir-para-moldura.html

Shadowbox botânico:
Botanical shadowbox:
https://manualidadesenaoso.blogspot.com/2019/05/shadowbox-botanico.html

sexta-feira, 19 de junho de 2020

Toalhinha de croché

Para o fim de semana partilho esta toalhinha de croché com gráfico:
For the weekend I share this crocheted doily with free chart:
Bem-aventurado o homem que suporta a provação; porque, depois de aprovado, receberá a coroa da vida, que o Senhor prometeu aos que o amam.
Blessed is the man that endureth temptation: for when he is tried, he shall receive the crown of life, which the Lord hath promised to them that love him.

quarta-feira, 17 de junho de 2020

Barra de flores para ponto de cruz

Criei esta barrinha de flores para bordar em ponto de cruz. A inspiração foi daqui:
I  created this floral border to embroider in cross-stitch. The inspiration was from here:


Clique na imagem para aumentar ou clique com o botão direito e abra num a nova aba.
Click on the image to enlarge it or click with the right button and open in a new tab. 
Mais gráficos para ponto-cruz:
More cross-stitch patterns:
https://manualidadesenaoso.blogspot.com/p/graficos-de-ponto-cruz.html

segunda-feira, 15 de junho de 2020

Suncatcher com vidro do mar

Continuando com as aventuras com o vidro do mar: 
Continuing my aventures with seaglass:

Fiz um suncatcher para a cortina da janela da marquise. Aqui o sol brilha da parte da manhã e faz reluzir as contas transparentes e o vidro do mar. 
I made a suncatcher for the curtain of my marquee. Here the sun shine in the morning and makes the transparent beads and seaglass glisten.

Para o móbile usei um arame flexível de artesanato e fui enrolando o vidro do mar e passei as contas pelos buracos. 
For the suncatcher I used some craft flexible wire I had and I looped around the seaglass and passed through the beads.


Depois fui juntando flores e conchas de croché que tinha guardado, na fita organza em cima e num bocadito de baker's twine que também tinha guardado.
Then I added crocheted flowers and seashells that I had kept, through the organza ribbon at the top and through a scrap of baker's twin I had also kept.

Este projecto é óptimo para reciclar bocados de fio e contas.
This is a great project to use scraps of craft wire and beads.
Mais ideias;
More ideas:

Móbile de verão:
Summer mobile:

Decoração de verão:
Summer decoration:

Libelinhas de contas transparentes:
Transparent bead dragonfly:

sexta-feira, 12 de junho de 2020

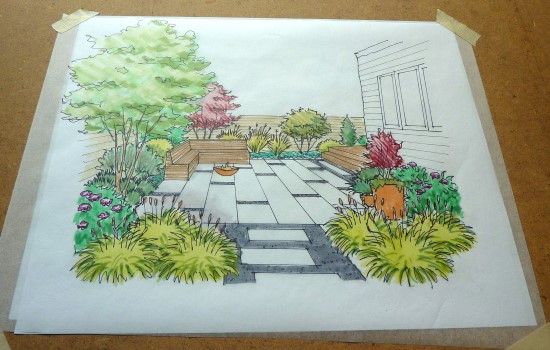
Como projectar um jardim

Para o fim de semana, partilho um site que dá dicas como desenhar e projectar um jardim:
For the weekend, I share a site that gives us clues of how to design a garden:
https://gardentherapy.ca/garden-perspective-drawing/

A importância da Fé no Senhor que contraria a moda da dúvida de hoje em dia
Peça-a, porém, com fé, não duvidando; pois aquele que duvida é semelhante à onda do mar, que é sublevada e agitada pelo vento.
Não pense tal homem que receberá do Senhor alguma coisa,
homem vacilante que é, e inconstante em todos os seus caminhos.
The importance of Faith in God contradictory to doubt which is so in fashion these days
But let him ask in faith, nothing wavering. For he that wavereth is like a wave of the sea driven with the wind and tossed.
For let not that man think that he shall receive any thing of the Lord.
A double minded man is unstable in all his ways.

quarta-feira, 10 de junho de 2020

Tarte de leite de coco e chocolate

Uns dias atrás, tinha feito feijão com legumes em leite de coco e caril. Infelizmente, quando me lembrei de fotografar, já era tarde demais.
Some days ago, I made beans with veggies in coconut milk and curry. Unfortunately, when I remembered to take a photograph, it was too late.

Muitas receitas acabam por não serem postadas, justamente porque só me lembro depois de almoçar ou jantar!! Até lá, a ideia de cozinhar e comer prevalece :D
Many recipes end up not being posted, precisely because I only remember after lunch or dinner!! Until then, the idea of cooking and eating prevails :D

Costumo usar cerca de 1/2 lata de leite de coco e depois guardo a outra metade numa taça de vidro, para não oxidar no metal. Assim tinha o restante do leite de coco para usar.
I usually use about 1/2 can of coconut milk and then I save the rest in a glass bowl, so it doesn't oxidize in the metal. In this way, I still had the rest to use.

Usei esta receita para inspiração, mas acabei por mudá-la substancialmente:
I used this recipe as inspiration, but I ended up changing it substancially:
https://evergreenkitchen.ca/recipe/vegan-chocolate-coconut-cream-pie

Primeiro, porque pede farinha de araruta (ou maisena), e eu tinha agar-agar. Depois pede seiva de ácer e eu tinha pasta de tâmaras. Assim acabei por fazer uma receita bem diferente, embora a ideia base está lá :)
First, because the recipe asks for arrowroot flour (or maisena) and I had agar-agar. Then, it asks for maple syrup and I has date paste. This way, I ended up making a very different recipe, although the base idea is there :)

Portanto, a receita que fiz foi assim.
So the recipe I made is like this.

Ingredientes para a base:
1 chávena de flocos de aveia
1/2 chávena de amêndoas + avelãs
3 c. sopa cacau em pó
1/2 c. chá de sal marinho
4 c. sopa de óleo de coco
2 bocados do tamanho de um polegar de pasta de tâmaras
Ingredients for crust:
1 cup of oat flakes
1/2 cup almonds + hazelnuts
3 tbsp cocoa powder
1/2 tsp sea salt
4 tbsp coconut oil
2 thumb size chunks date paste


Pré-aquecer o forno a 180ºC.
Preheat oven to 180º C.

Num processador, triturar todos os ingredientes até estarem bem incorporados. Desepejar numa travessa de tarte de ir ao forno e pressionar a base com firmeza.
Pulse all ingredients in a food processor until well incorporated. Pour onto a round pie oven dish and press firmly.

Levar ao forno durante 15 mimutos.
Bake in oven for 15 minutes.

Ingredientes para o recheio:
1/2 lata de leite de coco
3 bananas
1 c. sopa de farinha de amêndoa
1 c. sopa de cacao em pó
3 quadrados de chocolate negro 95% (picado)
2 c. chá de agar-agar
leite de arroz para dissolver a agar-agar
Ingredients for filling:
1/2 cup coconut milk
3 bananas
1 tbsp almond meal
1 tbsp cocoa powder
3 squares 95% black chocolate (chopped)
2 tsp agar-agar
rice milk to dissolve agar-agar


Numa cafeteira, despejar leite de arroz para cobrir o fundo. Colocar a agar-agar e mexer com uma varinha de arames.
Pour enough rice milk to cover the bottom of a small saucepan. Pour agar-agar in and stir with a whisk.

Ligar o forno e mexer até dissolver a agar-agar. Se necessário, adicionar mais leite de arroz. A agar-agar deverá dissolver depois de 5 minutos ou menos.
Turn oven and stir until agar-agar has dissolved. If needed pour more rice milk. The agar-agar should have dissolved after five minutes or less.

Despeje a mistura para dentro de uma liquidificadora e os restantes ingredientes. Misturar tudo até ficar cremoso.
Pour into blender and add the remaining ingredients for the filling. Blend everything until until creamy.

Tirar a base do forno e deixar a arrefecer alguns minutos. Despeje a mistura cremosa por cima e levar ao frigorífico até solidificar (durante a noite ou pelo menos por 4 horas).
Take the crust of the oven and let cool for a few minutes. Pour the blender mixture on top and chill until firm (overnight or at least for 4 hours).
Mais receitas em:
More recipes in:

Cheesecake de morango:
No-bake strawberry cheesecake:

Tarte de limão e coco:
Lemon and coconut tart:
https://manualidadesenaoso.blogspot.com/2015/04/tarte-de-limao-e-coco.html